July 30, 2013

Cherry blossom sink inspired bathroom

Back in 2009, Mr. H and I took a little trip to Taos, New Mexico.  While there we visited a local furniture shop and a vessel sink caught my eye.  It was black and red with cherry blossoms inside and on the front.  It was love at first sight.  I was inspired to design a guest bathroom around this sink when we moved into a bigger house someday.  We bought it and stored it in the basement still in its wrapping.

Fast forward to 2013, we were in the new house and it was time to renovate the guest bathroom!  I had not seen the sink in four years because I wanted to forget what it looked it and have it be a surprise to myself when I saw it again.  I was kind of nervous as Mr. H unwrapped the sink.  I hoped I would still like it as much as that day four years ago...and I did.  I still loved it.


Now  it was time to find a vanity for the sink to sit on.  I wanted to stay with the Asian style of the sink.  Here are a couple options I thought would work to give you an idea of the look I was going after:

Source
Source

Although I loved the look of these vanities, their price tags were not in our budget.  I had to consider a different option...what about a dresser or maybe a night stand that could be turned into a vanity?   Something like this:

Source
I loved this red Chinese cabinet,  but it was too wide for the space. 

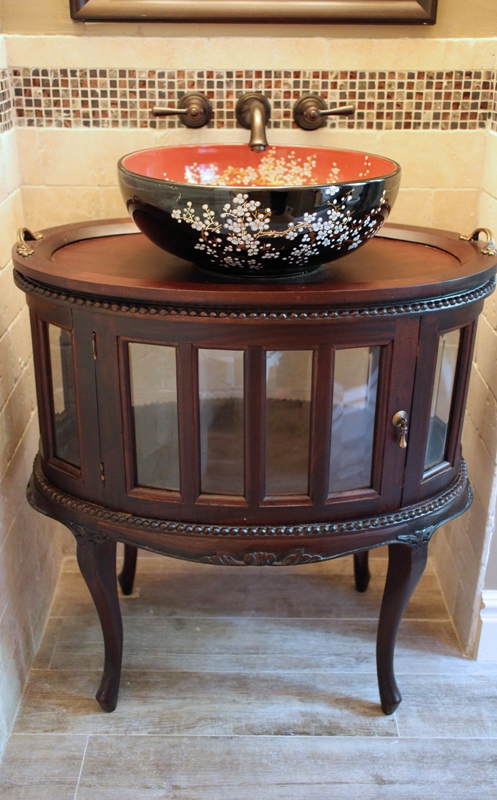
Then on a trip to Nebraska (both Mr. H and I grew up in Nebraska and both of our families are still there) we stopped at an antique shop and found the perfect solution!  It was a curio with a removable tray on top.  There were doors on the front and back so the back one could be removed to allow plumbing to pass through.  With the dark wood and the curved legs, I thought it would complement the Asian look I was going for and it was only $160!  This was what we were looking for and we took it home.


Our plumber drilled the hole for the drain, placed the sink on top and installed the fixtures.  It turned out beautifully!  Here is the finished product.


If you'd like to go the route of using a non-traditional vanity for a vessel sink, here are some things to keep in mind:
1) Take into consideration the total height of the sink and vanity once the sink is placed on top.  While shopping around, I found the average height of a bathroom sink to be around 35".
2) Make sure the vanity is deep enough to accommodate the sink and plumbing fixtures.
3) Decide if you are going to replace the top of the vanity with a countertop or keep the current top.
4) If the vanity is a wood product, protect it with some kind of finish so it doesn't get water damage. Our contractor sprayed a low sheen wood protectant on our vanity.
5) Decide what kind of faucet you will use.  If you choose a vanity mounted style, more holes will have to be drilled into the vanity to accommodate the fixture.

July 27, 2013

Copper and mint kitchen inspiration

As you may have read in my post about Antiquing in the Neighborhood I have a kitchen remodel in my future.  While this will probably not happen for at least a couple years, I've still been gathering inspiration. I am in love with the idea of a copper and mint kitchen.  Here are some inspirations.

None of these photos are mine. I've cited the sources where I could.

Source
The copper pans are a beautiful way to accent this kitchen.


I love the copper farmhouse sink.  
(I've tried to find the source of this photo but can't seem to find it anywhere...I've found it on a few blogs though they don't seem to be the original source. Please let me know if you know its original source.)


Source
Love the white and the different shades of green.  Love the open shelves and the color of the subway tiles. And although there is no copper in this particular decor, I think it can easily be added to this color scheme.


Source
The copper hood and bar top are lovely. I love the green subway tiles.


Source
Love the copper patinated looked of this countertop.

Over the next few years I will be collecting copper accents for my future kitchen. My first piece is the copper tea kettle I found at the antique store in my neighborhood.  Here is it again if you missed it before!

July 25, 2013

New camera

I recently ordered a new camera from B&H Photo and it just arrived today! I am so excited and wanted to share some pictures I took with it this evening. I took pictures of flowers around my house and also a few of my cats.  Also, for any 30 Rock fans out there, every time I've said "camera" today I've been saying it like Jenna Maroney. Cam-ah-rah. 

You can see the pollen all over the bee's body


My kitty Shady

Pretty kitty Shifty. She looks kinda annoyed by me.

July 23, 2013

Antiquing in the neighborhood

On my way home from work everyday I drive by an antique shop that is right in my neighborhood.  It never seems to be open.  Today I drove by and noticed that there were items set up outside...chairs, trunks, a bird cage so I thought it might be open and it was my lucky day!  The store was stuffed to the gills with treasures!  It went even farther back than what you could see from outside.  This it the type of antique store that I love!  Every nook and cranny filled, hardly room to walk around.  To me this means there are treasures that may have been forgotten behind other treasures, waiting for me to find them.  There's just so much promise.  I was so excited!

Look at the blue and white china in the back!
I just love copper.

Look at this box just waiting to be sorted through.

Here is what I took home with me, a copper tea kettle!  A kitchen remodel is in our 2-5 year plan and I want it to have copper accents.  This is the first piece!  I can't wait to collect more!


July 20, 2013

Inspired by raspberries and mint

Summer! It is in full swing. This one has been a hot one for Denver which has been very good for the raspberries in our yard. This past weekend I went outside to discover that our raspberries seemed to have ripened overnight!


I ate some of them right off the bush but I was inspired to make something yummy with them and do it fast before they over ripened.  Then I remembered we also had mint growing in the yard and I knew what to do!  Raspberries + mint = cocktail! 


I didn't want to run to the store so I just used what I had at home.  I am far from being a bartender so I just put together what tasted good to me.  It was a sort of raspberry-mint-lychee vodka drink.

Ingredients:
  • handful of ripe raspberries
  • about 10 mint leaves
  • 1/2 cup lychee juice
  • ice cubes
  • 1 1/2 shot of vodka
  • water
  • flowered mint sprigs for garnish
  1. Muddle the raspberries and mint together in a glass
  2. Add in the lychee juice and vodka
  3. Add enough water to your desired level
  4. Add as many ice cubes as desired
  5. Stir and enjoy!       (And of course you can always leave out the vodka)

And just for fun I thought I'd include this picture of raspberries and hops!  The hops were a wonderful surprise that I discovered while hunting for more raspberries.  Mr. H is a home brewer and he had wanted to plant hops.  If these hops are good, he won't have to!  I see some yummy framboise ale in my future!

All of these garden goodies were planted by the previous owners and we are reaping the rewards.  It's one of the best gifts anyone could receive from previous homeowners!

July 17, 2013

Built-In Wine Cabinet

Wine! A drink I love to relax with.  Perfect to pair with almost any meal.  A must-have in our home.


When we moved into this house last fall we really missed the built-in wine rack that we had in our last house.  I just love the look of a built-in wine rack. To me it says "class", it says "elegance", it says "we are prepared to relax and unwind at any given moment."  It's built-in, it's part of the deal. 

All hope for a built-in wine cabinet was not lost because this house did have a built-in cabinet.  I think it was meant to store dishes, linens and towels.  I thought I could do something with the lower compartment, but what? 

Inspiration hit when we were dining at a restaurant in Downtown Denver. They stored their wine on shelves with long skinny dowels separating the wine.  I thought, "That looks so simple! I can do that!" 


Before                                                                                After


Here is what I did:
  • Bought 1/2" thick boards and long wooden dowels that were 1"x 3/4".  I would have preferred 1" x 1" but they didn't have that size.  They come in varying lengths so you can just cut them down to size.  
  • I asked Mr. H to cut everything to size for me (I admit I'm scared of power saws!) and I started assembling it.  I left the top shelf without dowels to store decanters and other wine-related items. 
  • I used a manual staple/nail gun to fasten all the dowels to the shelves (okay, I'm scared of those air compressor nail guns too!)  A good tip is to cut a piece of wood to use as a spacer so your dowels are spaced evenly. 
  • Lastly, I used a simple white paint from Home Depot in a semi-gloss finish and painted the rest of the cabinet as well. 
 
And now we have a built-in wine cabinet once more!
 Cheers!

July 13, 2013

Moroccan hanging lanterns

I love how fire gives a warmth, coziness and intimacy to everything whether it's in a fireplace, a lantern, or just a burning candle. I wanted to bring this feeling to our back porch and actually got the inspiration from the previous owners of our house. 

This is a picture that was used on the MLS when the house was on the market. I'm not sure who took it, I will assume it was their realty team.  If you look above the table you can see little lanterns hanging from the beams.


I loved this idea and after we moved in I wanted to hang lanterns as well.  I went to World Market and found the perfect lanterns. I love the Moroccan/Bohemian look but it doesn't go too well with the rest of our transitional home décor style...plus Mr. H finds large doses of it to be a bit too girly for his taste.  It is perfect for the back porch, though! Stayed tuned to see if I can sneak this look in anywhere else ;)


July 10, 2013

Tea anyone?

One Saturday afternoon I drove by a little shop in Denver called ReZENed and thought it would be fun to go in and see what they were all about. I was thrilled to discover that they specialized in antiques and gently used furniture and home accessories.

I occasionally enjoy a cup of tea but I wouldn't consider myself a tea drinker but when I saw this set I knew I had to have it. I loved that it was a coppery silver and aged and tarnished.  I imagined an English tea party with scones and biscuits.


I loved how the handles scrolled and curled.


I loved the intricate blossom detailing on top of the lid and how the copper was starting to show through.

The stamp on the bottom of the pieces say "Silver on Copper" and under that there is a crown and the initials B.S.C. which I Googled and found to stand for Birmingham Silver Company.  How cool!

Since I like being able to use things for their intended purposes, I thought that maybe this tea set would give me a good reason to start being a tea drinker but so far I've only used it as a vase for my lavender.

In an article I read about buying antiques, it said if you are drawn to something, if it touches your heart, if you love it and you can afford it then buy it! It doesn't have to have an obvious use right now, it doesn't have to have a monetary value, you just need to love it and enjoy it.

July 7, 2013

My first attempt at distressing furniture

I've always liked the look of distressed furniture but never thought I could do it myself until Mr. H gave me this book as a gift: color recipes for painted furniture by annie sloan. She gives instructions on how to transform tired looking furniture into something entirely different with paint "recipes".
 

After reading the book I was inspired and ready to experiment. I needed a piece of furniture that we didn't care too much about and found this chess table. I forgot to take a "before" picture so this is the best one I could find.
 

I must admit that although the book was an inspiration, I didn't follow the instructions exactly...as I did not have the same paints and tools that she had and I figured I could improvise with what I already had.
Here is what I did:
1) Painted the wood with white spray paint
2) After it dried, I sanded the edges with 150 grit sandpaper
3) I realized I needed another color to offset the white, so I took some light blue paint and blended it into some of the joints and seams with my fingers.  Here is the finished product:


My favorite part of the distressing was the little crater on
the right corner that I didn't notice before.
Some lessons learned:
1) Don't worry about being too careful. After my first attempt at sanding and trying to make it look distressed, you could hardly tell I did anything. I was afraid of taking too much paint off. I had to sand off more paint to get the look I wanted. Do not be too scared of "ruining" the piece of furniture. It's supposed to look used and kind of like it's falling apart!

2) Something else I would do differently next time is paint the color I want to "peek" through first, under the main color. In this case, it would have been the light blue under the white. Then when you sand it, the color underneath will show through.

July 3, 2013

A gem of a door

Mr. H and I were walking to the neighborhood pub the other night and this door caught my eyes.  


I love rustic hardware so I was intrigued by how solid and sturdy the hardware was, how old and beautifully aged it looked.
 
 
As we were taking pictures of the door, the owner of the house came out and invited us in to see the inside of the door. Thinking it probably looked like the outside and not wanting to intrude, we politely declined. She opened the door anyway and we both had to say "Wow!" What a beautiful surprise!


LinkWithin

Related Posts Plugin for WordPress, Blogger...